Posts

Final Personal Retrospective

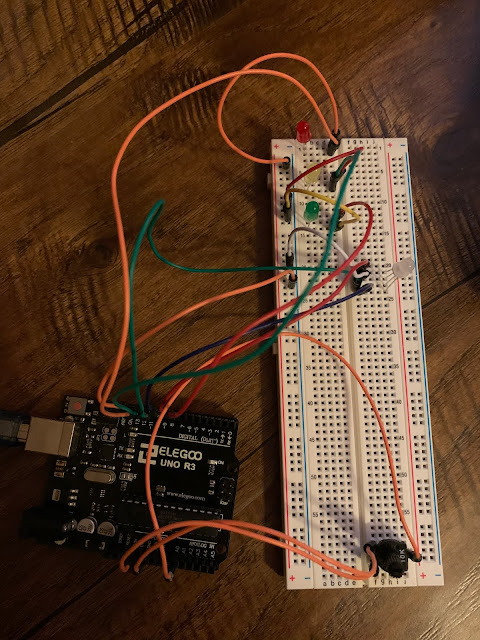
This is my last post for this class.  It is hard to believe that 6 weeks has already gone by and this class is just about over.  As I look back over the last 6 weeks I think the build that I am the most proud of is the digital dice one.  Even though it proved to not be totally random it still was the most fun and challenging build.  It took me a while to come up with the idea of what to do and then it took even longer to see it happen but when it did I think it was the coolest build that I did.  I think that the first week was challenging to figure out how to build the circuits but I think as the weeks went on it got easier and easier to build with the Arduino. I think that is the thing that I learned the most is that I was capable to do these kinds of things.  I would often see builds done like this on youtube as I was browsing around but I would always think that these are way to hard for me to actually do but now I think I might try one the next time that I see it.  I think the bigg

Motor with sonar

So this week’s challenge was to build something that involved motors and sensors. I decided to make mine out of a servo and a sonar sensor. Here is the code... #include <Servo.h>  Servo servo1;  long distance;  long duration;  int trigPin = 10;  int echoPin = 9;  void setup() {  servo1.attach(8);  pinMode(trigPin, OUTPUT);  pinMode(echoPin, INPUT); }  void loop() {  ultra();  servo1.write(0);  if(distance <= 10){  servo1.write(90);  }  }  void ultra(){  digitalWrite(trigPin, LOW);  delay(2);  digitalWrite(trigPin, HIGH);  delay(10);  digitalWrite(trigPin, LOW);  duration = pulseIn(echoPin, HIGH);  distance = duration*0.034/2;  }  This challenge didn't seem to hard to program but I was swamped with other work that I had to do for my job so I was unable to build the circuit this week to actually test to see if it worked.  I think it should have but I will try it next week but since this is due today I thought tha

LCD awesomeness

Image
So for this week I decided to do the LCD display. I chose this one because I thought it would be fun to do. So basically the challenge was to display something on the LCD. I also thought that this would be challenging so I started to do this.  I read a lot online and there is really only one way to set this up.  So I just copied the one in the starter guide. so here is the set up. This is what it looks like it real life. Here is the code. #include <LiquidCrystal.h> LiquidCrystal lcd(12,11,5,4,3,2); void setup() {   lcd.begin(32, 2);   lcd.clear(); } void loop() {     lcd.setCursor (0,0);     lcd.scrollDisplayLeft();     lcd.print("Merry Christmas and a Happy New Year");     delay(200);     } Here is the video of it working.  There really was not much challenge of getting this working.  I just followed the diagram and then changed the code to print what I wanted it to print.  It cut it off so I decided that I needed it to scroll so I lo

Does God play dice?

Image
So for this weeks challenge we were told we had to make a die, a digital die.  This was a cool project. At first I just used a line of LEDs to show what number that you had but then I thought I should probably make it look like a real die so I thought I would rewire it and make it look like a real die.  So here it is. So that was my first attempt the code for that one looked like this... int pinLed1 = 12; int pinLed2 = 11; int pinLed3 = 10; int pinLed4 = 9; int pinLed5 = 8; int pinLed6 = 7; int buttonPin = 2; int buttonState = 0; long ran; int time = 1000; void setup () {   pinMode (pinLed1, OUTPUT);   pinMode (pinLed2, OUTPUT);   pinMode (pinLed3, OUTPUT);   pinMode (pinLed4, OUTPUT);   pinMode (pinLed5, OUTPUT);   pinMode (pinLed6, OUTPUT);   pinMode (buttonPin, INPUT);   randomSeed(analogRead(0)); } void loop() {   buttonState = digitalRead(buttonPin);   if (buttonState == HIGH){     ran = random(1, 7);     if (ran == 1){       digitalWrite (pinLed

It is the final countdown

Image
SO this weeks challenge was to make a multi LED count down to some even.  I chose my event to me a RGB-LED go through the entire spectrum of it's colors.  So here is the code.  I spliced a lot of the code from the example that our teacher gave us and then added my own. So here it is... const int RED_PIN = 9; const int GREEN_PIN = 11; const int BLUE_PIN = 10; int red_LED = 13; int yellow_LED = 12; int green_LED = 8; int knob = A0; int DISPLAY_TIME = 10; void setup() {   pinMode(RED_PIN, OUTPUT);   pinMode(GREEN_PIN, OUTPUT);   pinMode(BLUE_PIN, OUTPUT);   pinMode(red_LED, OUTPUT);   pinMode(yellow_LED, OUTPUT);   pinMode(green_LED, OUTPUT);   } void loop() {   //int displayTime = analogRead(knob);   digitalWrite(red_LED, HIGH);   delay(2500);   digitalWrite(red_LED, LOW);   digitalWrite(yellow_LED, HIGH);   delay(2500);   digitalWrite(yellow_LED, LOW);   digitalWrite(green_LED, HIGH);   delay(2500);   digitalWrite(green_LED, LOW);   //countDown();  

Arduino Analog input for a digital output

Image
So this week was a bit more challenging in fact I never got it to work exactly the way that I wanted to despite several days of trying and failing.  I guess I just found a whole ton of ways to not make a led get brighter with a variable resistor. Anyways the goal this week was to make a LED brighter by wiring a analog input from a variable resistor.  So anyway maybe there is someone that will read this blog and help me to understand why it didn't work the way that it was suppose to. So here is the code that I used to make this project try and work. int led= 13; int knob = A0; int output = 0; void setup() {   pinMode(led, OUTPUT); } void loop() {   int val = analogRead(knob);   output = map(val, 0, 1023, 0, 255);   analogWrite(led, output); } Here is a video of it "working" So as you can see from that video that it didn't work as intended so I thought I would play around with it for a while.  It took me several days of changing the ports trying di

Arduino blinking LED

Image
So this is the first project in my new class called makerspaces. I am really excited to get into exactly what a makerspace is and how I can use one or have a mini version of one on my campus perhaps. So the first project is to use this tiny controller called a arduino uno to make and led blink. It is a pretty simple circuit with a resistor and an led in series with the controller. You then type the code that is below in the arduino program software on you computer and then you upload it to the arduino uno using a USB cable and then there you have it your led starts blinking. It is actually really cool but very simple to do. This is the schematic that I used to design the circuit. This is what it looks like in real life. Here is a little video of me explaining my project. There really wasn't too much trouble with this project. It worked the first time that I plugged it in. the only thing that I did for trouble shooting is I plugged the LED straight into